
Monday, November 12, 2012
Tween Gift
Tuesday, October 30, 2012
Onesie dress tutorial


Monday, October 29, 2012
Onesie Dress for Baby Shower

Thursday, July 12, 2012
American Girl Accessories & Tutorial
I have been busy making some american girl accessories. I made my niece a blanket for her AG doll and some sandals for my other nieces' doll. I also made some stockings for my daughters doll.
 Blanket was made using a fat quarter fabric. I used a fat quarter with minky fabric.
 The sandals were very easy to make. I used black foam and stickers. I couldn't find the link to the video tutorial. Just google fave crafts youtube videos on american girl sandals and you will find a tutorial.
 The stockings were the easiest to make. I used one of my daughters old soccer socks.
 Cut the bottom of the sock off and cut through the center of the sock.
 Sew through the bottom of feet and continue sewing until you reach the other side. Turn over and "voila" stockings for your doll.


Tuesday, May 15, 2012
Silhouettes - Tutorial

I finally had a chance to make silhouettes of my children. I had the perfect spot too - right above my bed. I love looking at my girls when I walk into the room. Making the silhouettes was easy. You just need a camera, children, black cardstock paper, canvas, black paint (optional) and background paper (I used an inexpensive bible).
First, take pictures of your child, print out, trace and cut out of black cardstock paper.


Next, decoupage your background pages onto the canvas. You can use scrapbooking paper, book pages or just paint the background. I wanted to use our favorite bible pages so we used the book of Psalms, John, Ephesians, Galatians and Corinthians.

Note: At first, it was difficult tearing up the pages of the bible. Once I convinced myself it was for a good cause, it wasn't so bad.
Lastly, glue everything down. The hardest part was trying to get rid of bubbles on the silhouettes. I used a different cardstock paper that I found at walmart and I had a hard time getting rid of the bubbles. Not sure if it was me or the paper.
Overall, I loved the way it turned out. My wall definetely needed a little something something to make it look pretty.
Here is the before . . .

After . . .

That pillow is driving me crazy! I should of fluffed it before I took the picture.
Friday, April 20, 2012
Popsicle stick bracelets
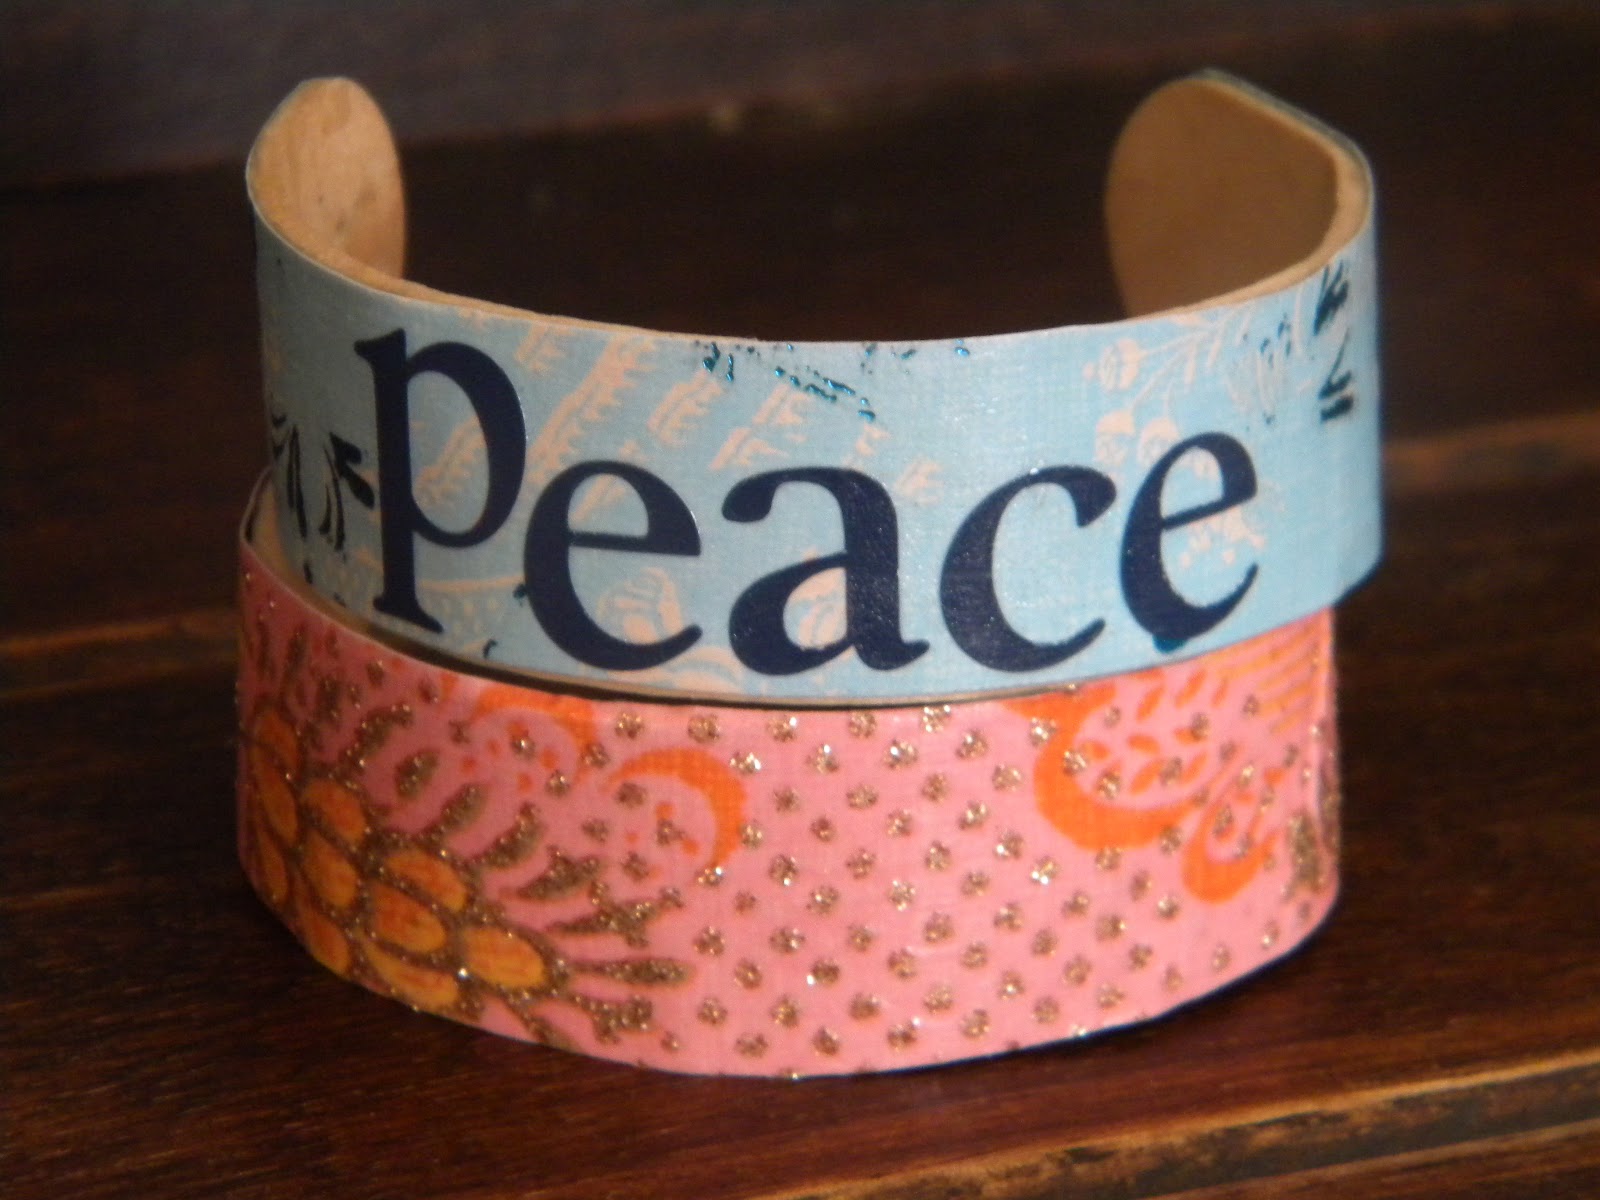
First, soak the popsicle sticks in water (at least 24 hrs).


Then, carefully bend the sticks and place in a cup (I also used a water bottle). Let the popsicle stick dry overnight.

Paint, decoupage with scrapbooking papers or just add sparkle and you are done!

You can also add letters and write a message or put your initials. The possibilities are endless! This project did not cost me a cent since I already had all the supplies (my husband would appreciate that!).
Wednesday, April 18, 2012
Watch ME Draw
Sunday, April 15, 2012
Blessed Square Bear
I just created a new Blessed Bear to give to a friend at her baby shower. My girls thought it was the cutest one that I have made so far. I loved the little bear too. She was made with lots of love and prayer.
The verse written on the bear was Zephaniah 3:17 "The Lord your God is in your midst, the Mighty One, will save; He will rejoice over you with gladness, He will quiet you with His love, He will rejoice over you with singing."


Wednesday, March 21, 2012
Easy Play dough
I found an excellent recipe for play dough. The dough was easy to make and it feels and smells great. I can't seem to keep my hands off of it. I will be giving this batch to my great nephew Mathew so he could play with it. He's going to love it! I made grape and lime scent play dough.


Easy play dough recipe:
1 C flour
2 TBS salt
2 TBS cream of tartar
2 TBS oil
1 C warm water
1 3.5 oz of jello (any flavor you like)
Mix all ingredients in a pan on medium heat. Continue to stir continuously until it thickens and comes together. Pour onto a floured surface and knead (careful, it will be hot!). Let dough rest and cool for at least 30 minutes.
Tuesday, March 20, 2012
Happy Spring
Today's haiku is brought to you by my daughter, Isabelle. She was feeling creative this morning and wrote a haiku poem for spring:
The sun is warming
I feel the cool breeze flowing
Spring has come today.
Team Cassandra's Kisses
Our family is participating in the Epilepsy's Foundation 5k walk/run on Sunday, April 15th in beautiful Mission Bay. We are walking/running for our daughter, Cassandra, who has epilepsy. She recently started having seizures again (mild) after not having any for the past 2 1/2 years. Praise God they are still under control. Because Cassandra is non-verbal, she uses kisses to communicate her happiness and love to us. I made baggies with chocolate kisses and will be "selling" them for a suggested donation of $1.00 or more.


If you would like to participate in the walk/run or donate to Team Cassandra's kisses, please click on the link.http://sharonsride2012.kintera.org/mariolopez?faf=1&e=5535658155
Monday, March 19, 2012
Mixed Media Art
I'm experimenting with a new craft, mixed-media art. I have been practicing drawing faces lately. Although, I have a long way to go, I did like the way my girl came out. I still want to cut out words from magazines and paste on poster to finish her off.


I also drew smaller portraits of girl angels. I think I still need to practice drawing angel wings.

Wednesday, February 15, 2012
Valentine's Day
Finally finished the chair mailbags for our valentine day notes. Our bags were full to the rim with goodies, notes and snacks. We had a good time reading our notes from each other out loud.


Also made chocolate chip cookies with heart sprinkles and chocolate fudge cookies for our friends.

Monday, February 13, 2012
Fingerprint Valentines
Since Cassandra doesn't write, I helped her print her pointer finger on the little cards and made "love bugs" and "hearts" for her classmates. I then attached a lollipop or sweetheart tarts. Her sister Isabelle glued googly eyes on the love bugs. So cute!


Sunday, February 12, 2012
Valentine cards
My mom and I attended a Stampin up workshop on Friday and this is what I made:

I'm filling the heart card with candy and giving it to my hubby for Valentine's Day. The class was so much fun! I am considering becoming a Stampin Up Demonstrater so I could have fun workshops all the time.
Saturday, February 11, 2012
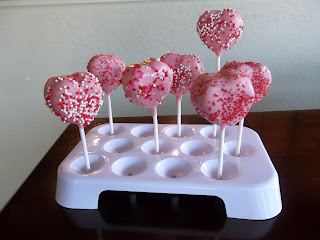
Valentine Cake Pops Tutorial
I made vanilla cake pops for my mom's church fundraiser. These cake pops were easy to make using the silicon heart mold I had.

 I found this heart silicon mold at Michaels craft store a while back. I also use it to bake heart brownies.
 Carefully, pop out the cake pops and then dip a lollipop stick in melted chocolate and insert into heart. Refrigerate for another fifteen minutes.
 Dip heart pops in melted yumminess! Sprinkle goodness and refrigerate for another fifteen minutes.


Tutorial:
First, bake a cake. Check out Bakerella's blog for detailed instructions on how to make cake pops. I made these cake pops with a vanilla cake mix. After you bake the cake, crumble it to pieces. Add some frosting (about half a can of frosting) and mix together well. Roll into balls and press into heart mold. Refrigerate for about fifteen minutes.


Make sure to have a stand or styrofoam base to insert pops for drying.

Here is the finished product. Pretty cute I say. I also made a sign for my mom to display.
Tuesday, February 7, 2012
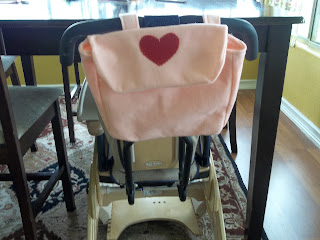
Valentine Chair Backer
I love traditions. One of the traditions we do for valentines day in our home is put out mini mailboxes for each family member. Throughout the day we each put in goodies and messages to each other. After dinner we read our love notes and eat our goodies. The problem with this idea is that the mini mailboxes get full right away and not too much stuff fits.
So, this year I wanted to make some valentine chair backers that could fit a whole lot of stuff. I found this great blog www.ourscoop.blogspot.com that has a great tutorial. So far, I have completed two bags and have three more to go. Here is my work in progress (WIP):

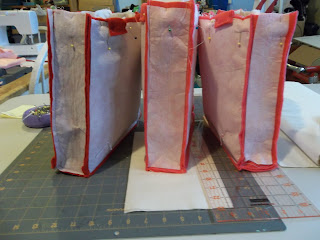
So, this year I wanted to make some valentine chair backers that could fit a whole lot of stuff. I found this great blog www.ourscoop.blogspot.com that has a great tutorial. So far, I have completed two bags and have three more to go. Here is my work in progress (WIP):

Papa chair

Cassandra's chair (her bag fits on her special needs chair)

I still have Alexis', Isabelle's and mama's bag to complete.
Monday, January 30, 2012
Valentine door wreath
I finally finished working on our Valentine door wreath. I was really pleased with it and it didn't cost a thing. I used an old wreath and covered it with black satin fabric I had in my stash. I then used red felt I had left over from a previous project and made very simple flowers. I hot glued them on and voila, valentine door wreath.


Subscribe to:
Posts (Atom)